Tuesday, May 28, 2013

Tips On Tuesday: Razzle Dazzle 'Em!

I can't stress enough that nail art doesn't have to be this elaborate water marble or fancy tape mani or look like some famous painting. I love seeing beautiful, detailed nail art as much as the rest of you, but sometimes I want to do something besides paint my nails for 4 hours trying to recreate the Mona Lisa. 


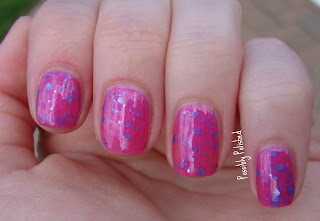
All I used for this mani, was one favorite color polish and a good glitter.
And this bad boy could even be work appropriate if you choose a neutral shade. 
Think a nice soft pink with a gold or silver glitter accent nail!


I used Orly La Vida Loca, a lovely bright, but cool fuchsia, this is definitely a new favorite color of mine. The blue undertones just make this shade so perfect for my skin tone. She is opaque in 2 coats and has a nice subtle shimmer about her. With a top coat, she really shined!


I decided to mix it up a bit and use my pointer as my accent nail this time.
I really envy The Nailasaurus and her manis, and I owe the inspiration for the glittered accent nail to her! I just LOVE when she incorporates this look into her manis.


I used 2 coats of SH Gem Crush Razzle Dazzler for my accent nail.

I used to hate glitter, but since I have discovered PVA Glue, which is just Elmer's Non-toxic glue, I don't worry so much about removal. Elmer's glue creates an easy peel off base coat, that makes glitter removal a cinch.
One coat of Elmer's, 2 coats of glitter and 1 NYC top coat and I was good to go!

What do you think of when you hear 'nail art'? Would you call this 'nail art'? 
How do you rock glitter polishes? Let me know in the comments!

Happy Tuesday!

Monday, May 27, 2013

Marbling for Memorial Day

I am going to keep this post short and sweet, since just a moment ago I burned my little fingers on my curling iron and I am having a time typing :(
I tried a Water Marble for this Memorial Day. I have never had good luck with water marbling and it took me probably about five re-dos on each finger to get this look. This is definitely something that takes practice.


I started with a base of China Glaze White Out. I used Zoya Carmen, CG White Out, and Revlon Indie Night for the water marble on my accent and pointer finger. 


Zoya Carmen is the beautiful red you see on my other fingers. This is 2 coats over a SH base coat. Carmen was shiny enough on her own, but I did use NYC top coat.


Have you tried water marbling? It is definitely a longer and messier process than I thought it would be!

Crazy For Coupons: May 26th thru June 1

Happy Memorial Day! 
I will have my Memorial Day Mani up on the blog later today.
I can't believe it will be June at the end of this week already!
On to the sales!

There is an ongoing makeup markdown going on at CVS as they are trying to get rid of older product to make room for new! There are a TON of 50-75% off items. Some of the stores are not putting markdown stickers, but if you head to the Extra Care scanner thing, you can check the price! Orly nail polishes are ALL being marked down to 50% off! You can see the full list of markdowns at Nouveau Cheap HERE
Maybelline Cosmetics, Almay Cosmetics Buy 1 Get 1 50% off (BOGO50)
Loreal Cosmetics is Spend $10 get $3 Extra Bucks back
Revlon Spend $10 get $4 back in Extrabucks
Neutrogena Cosmetics, Buy 2 items, get back $6 in Extrabucks (aka their makeup is probably expensive)
Covergirl, Spend $10 get $3 back in Extrabucks.

Maybelline Cosmetics, Revlon, Covergirl, Almay and SH Cosmetics, Loreal Cosmetics BOGO50

Revlon, Loreal, Covergirl BOGO50
Spend $30 on any Nail Polish, get $10 back in +UP rewards

Best Deals:
Checking out CVS for marked down makeup is what I will be keeping an eye out for!

Hope everyone had a great Memorial Day!

Sunday, May 26, 2013

Sally Hansen Fuzzy Coat Review

On my most recent Target run (which turned into a Target Meander -- typical) I spotted the new Sally Hansen Fuzzy Coats. These are dupes from the Nails Inc. Feather polish line.
From all of the swatches I have seen of these "feather" - "fuzzy" coats online...I hated it. I did not think I would like these glitter toppers AT ALL. Nope, Nope, Nope!


Well, as I walked by the display, I checked them all out and hung on to Wooly Knot, trying to decide if I should pick it up for you all. I ended out swatching it on one finger and, much to my surprise...I LIKED IT! So here it is!


 I used 2 coats of Essie Avenue Maintain, and 1 light coat of Wooly Knot with 1 topcoat of NYC.


Wooly Knot is a glitter bomb of white and light blue matte bar glitters. This glitter is pretty dense, and could achieve opaqueness in 3 generous coats. And then you would probably need a chisel to get it off. Dry time was quick. I would most definitely recommend a glue/PVA base for this glitter.


I wanted to see it over another color, so I layered 1 light coat of Wooly Knot over 2 coats of CoverGirl Outlast Glosstini mini in Pina Colada.


Pretty stinkin' cute! My sister swatched this over a nice bubblegum pink and it looked so cute over that too! Sort of like birthday cake!
I was super surprised I liked this glitter, and I can't wait to experiment with it over some other colors.
I am guessing these are also LE, since they were on the same display as the Sugar Coats, but I am not sure!

What do you think? Would you wear a Fuzzy Coat? 
(the name sort of makes me cringe)

Wednesday, May 22, 2013

Indie Review: Pipe Dream Polish Part 2

Hi again! Today marks a wonderful milestone for me. Exactly 2 years ago today, I graduated college!
When April from Pipe Dream Polish let me choose some of her polishes at a discount to review, I couldn't wait to get my hands on Play Your Game.
All of April's polishes are cruelty and Big 3 Free.


See my review of the first 2 polishes in the set HERE.

  
Bottle shot.
Play Your Game is my Alma Mater's school colors. I just had to have this for this occasion.


This is a glitter polish in a clear base. There are a TON of glitters in here. There are small and medium silver, gunmetal, purple and violet holographic hex glitters! I love me some holo glitters!


I used 2 layers of Essie Boxer Shorts as my base before adding one coat of Play Your Game. I had absolutely no trouble getting plenty of glitters on my nails.


Shown here is 2 coats of Essie Boxer Shorts, 1 coat of Play your Game with 1 coat of NYC topcoat.


 I mentioned in my previous post that all of April's polish names are inspired by songs and/or their lyrics.
This ones name came from Bon Jovi's Shot Through the Heart.

I love this glitter so much. It fondly reminds me of my college days (and how I wish I could go back!).
You can check out the rest of Pipe Dream Polishes on April's Etsy HERE and definitely follow her on facebook to be in the know on all Pipe Dream Polish happenings!

Tuesday, May 21, 2013

Tips On Tuesday: All Buttoned Up!

I have been reading every one's comments from my Celebratory Giveaway and a lot of my readers are interested in easy nail art tutorials! I listened :)
 One of my very best friends is a nail art newbie and a couple of weeks ago she sent me a photo of her first ever nail art. If you are looking to start getting into nail art,
this is the perfect design to start off with!
And once you get this down -- you can try my Flower Nail Art Tutorial!


All you need for this design is 2 polishes and a Bobby Pin or a dotting tool.


 You will need a Bobby that has little nubs on it like this one. Bend it apart so it is easy to hold. If it is too small and hard to hold, try wrapping some thick tape around it to make a grip.


1. Start by painting your base. 
I used 2 coats of Essie's DJ Play that Song from their 2013 Neons Summer collection.
I waited about 25 minutes for my nails to dry before I started the design. It is easiest to work on nail art when you aren't worrying about messing up wet nails! 
Take your time!!


I used an Art Club striping polish in white that I dripped onto a paper plate. Almost any polish will work! A runny drippy polish is not good for dots though!

2. Dip your Bobby Pin into the white polish and then lightly dot it onto the middle base of your nail.

TIP: If you feel like your Bobby Pin Dotting hand isn't steady enough -- try bringing your nail up to the Bobby (instead of the Bobby to your nail!)


3. Wipe off any excess polish from the Bobby from the first dot onto a napkin. Dip your Bobby into your dotting paint again, and lightly make another dot in front of your first dot.


4. Wipe your Bobby off again! If your dotting polish gets goopy, just drip more onto the plate!
Dip your Bobby into the polish again, and add another dot in front of the second dot.

Voila!
Nail Art takes practice, and it is O.K. not to get it perfect on the first try.
Dots are a great base to several other designs,
so work on perfecting these and go crazy with different combinations!
Do a diagonal dotticure, instead of down the center or make more than one line of dots! The possibilities are endless :)

Will you be trying this tutorial? What Polish and Dot combination will you do?
Post photos of your Buttoned Up Mani to my facebook wall! 

Monday, May 20, 2013

Sally Hansen Sugar Coat Review

Double posting today. 
If you missed my earlier Crazy for Coupons post, Check it out HERE! There are some awesome ways to snag some Rite-Aid polish coupons!
I am obviously on the textured polish bandwagon, judging by my Zoya textured polish review here, The Julie G Gumdrops here & here, and the China Glaze textured here!
I was less than thrilled with the China Glaze textured (with the exception if Itty, Bitty, Gritty!) so I was a littler nervous to try another textured that didn't have glitter.


However, I am super happy to report, I LOVED this polish. 
I picked up the SH Sugar Coat in Cotton Candies from Target


Cotton Candies is a bright bubblegum pink. I used 2 coats, no base coat or top coat for these swatches. This polish went on smoothly and was opaque in 2 coats.


It had an average dry time and of course, dried matte. I loved that it wasn't super gritty and didn't cause anything like my clothes or hair to snag on them. It was definitely a more fine grittiness than the CG Textured polishes. 


While this color doesn't seem to be overly unique, since we have seen quite a few pink textured polishes out, I loved this pink color. I do wish I picked up Bubble Plum (a lovely cool lilac purple!) though, since that shade seems to be a more unique textured color.
These are limited edition so grab them while you can!

Have you spotted these at your Target? Are you on the textured bandwagon yet? Why or why not?!

Crazy for Coupons: May 19th thru May 25th

Is it Monday already?! 
At least next Monday will be a holiday for me and I will definitely be lazying around in the sun all day!
On to this weeks sales!
As always, you can click the retailers name and get taken directly to the ad/website.

The super Sally Hansen Cosmetics, spend $10 get $5 Extra Bucks is still going on! *Best Deal
The Wet n Wild or Spoiled Nail buckets (with flip-flops) is $9.99 get $4.00 back in ExtraBucks. I have seen these totes in the store and they are pretty cute!
Milani Cosmetics, Wet n Wild, NYC, Salma Hayek Cosmetics, Rimmel Cosmetics and Maybelline Eye Cosmetics are Buy 1 Get 1 50% off (BOGO50)
Revlon Cosmetics, Spend $15 get $7 back in ExtraBucks
Almay, Spend $10 get $4 back in ExtraBucks

Loreal, Almay, Maybelline, and Revlon Cosmetics are BOGO50
$1 off any $2.99 or more Wet n Wild Purchase (BONUS: $1 off coupon in most Sunday Papers!) *Best Deal

Rite Aid does the neat-o thing where if you watch some Video's they will give you coupons for things, like nail polish. So watch these Vid's HERE and snag some coupons! Most of the coupons are limited to 10,000 prints so grab them while you can!
You can also snag even more awesome polish coupons HERE.
Maybelline Cosmetics, Loreal Cosmetics (coupon in link above), Almay Cosmetics, Wet n Wild, Neutrogena Cosmetics are BOGO50
Spend $12 on BonneBelle or Jessie's Girl Cosmetics (snag a Jessies Girl Coupon in the link above!) and get $6 back in +UP rewards *Best Deal

Happy Couponing!


**This post contains affiliate links**

Sunday, May 19, 2013

Indie Review: Pipe Dream Polish Part 1

Too many life mishaps this past week, but back to regular postings!
Tonight I have some new (to me) indie polishes to show you. These polishes were provided to me at a discount for my honest and unbiased review. 


Pipe Dream Polishes are handmade by April and are cruelty and 3 free.
I am so happy to have these to show, because out of all the indies I own these are by far my favorite.
I have 2 to show you tonight and the third I will be posting on Wednesday!


The reason I love these, is because they are all so unique and are unlike any indies I have seen or any polishes I have in my collection. 
All of April's polishes are named after songs. 
First up we have Lost in Confusion, based on the lyrics from Lovefool by the Cardigans.


Bottle shot of Lost in Confusion. 


 Lost in Confusion has small and medium periwinkle hex glitters with bright blue micro flakes. The glitters are suspended in a cool bright pink/fuchsia crelly base. The blue glitters in this polish made it lean towards a purple/pink color.


Seriously, have you ever seen a polish like this before?! I LOVE it. I have worn it twice since I received it and every time I just can't get over how beautiful it is.


Close up Macro! 
:Faints: 
Falling in love with this pretty all over again!


Lost in Confusion went on so smooth! The first coat was sheer, but it built up so nicely and was opaque in 2 coats. Dry time was average. Shown here is just 2 coats, no base coat/undies, and a top coat of NYC. I gave the bottle a good shake before I started and before my second coat and I got just the right amount of glitters on each finger.


Next up we have the equally as unique, Pink Elephants and Lemonade. This polish is based on the lyrics in Dear Jessie, by Madonna. Bottle shot shown above.


Pink Elephants has small and medium hot pink and deep yellow hex glitters. The glitters are suspended in a dusty turquoise crelly base. 


This polish is just so fun! I love the funky combination of pink and yellow in the turquoise base. Pink Elephants went on smooth and was totally opaque in 2 coats, shown here. No undies or base coat and one coat of NYC top coat. Dry time was average.


Up close Macro shot! I love how nicely this built up!


Sigh. I love these polishes. April, be prepared for another order from me! 
I will surely be working on collecting the rest of April's creations.

When I received these in the mail, my purchase came with a piece of paper with all sorts of info about Pipe Dream polish and on glitter polishes in general. I love that April included this FAQ sheet with her polishes, because it answered any questions I might have had before I even had them! Her sheet also gave tips on how to get good glitter coverage (shaking the bottle/dabbing method) as well as tips on glitter polish removal! 

You can check out her other polishes on Etsy HERE and follow her on facebook HERE for updates on new polishes and restocks! Stay tuned for the other polish I chose coming this week!


Tuesday, May 14, 2013

Tips on Tuesday: Nails in a Pinch

Very rarely do I walk around without polish. Unless it was a totally planned event, I liken it to leaving the house without makeup. I just feel so nekkid without my polish! I felt weird about bringing polish with me to the hospital this weekend for the birth of my nephew, so I figure this was as good a time as any to try out Kiss IMpress Broadway press-on nails.


I'm not sure if these are named and I promptly misplaced the package after these photos, but I picked a Hawaiian summery theme. 
They even come in a variety of lengths! Short, Long and regular. I went with the short.


 Notice that these boast NO GLUE needed!
That is, in fact, a very true statement. These press-on nails are totally glue-mess free! 
The inside of the false nail is already coated with a sticky glue.
At the cuticle end of each nail there is a small plastic tab that is sticking out. You simply tug the tab up and peel the backing from the inside of the nail, and then you place it on your nail and secure it in place. SO easy!


They nails come in this cute little nail polish shaped bottle, that it PERFECT for storing the leftover nails. My mom wears false nails a lot and she says that she has a hard time keeping them in the packaging, so that this design is really helpful. I just think it is cute! You simply pull off the top and open it up like a suitcase and they are all there inside.


You can see some of the leftovers in the bottom of the bottle. I like these a lot because some of my nails are more curved than others, and these were very flexible and fit my nails perfectly. I have some tiny nails too, and I have no trouble finding enough sizes to fit all of my fingers evenly.


 I wore these for a couple of days, through several showers and a ton of handwashing and none of them came loose. When I wanted to take them off, I used an orange stick to get underneath the edge and just peeled it off! Because they are flexible, they came off easily and pain free. NO residue was left behind, either.


THIS was the only thing I didn't like about these. Because of the glue, they were slightly raised from my actual nail, as you can see in the above photo. This made them feel a little thick to me. I think this particular design is cute, but it definitely said "false" nails to me. However, my mom LOVES this brand of press-ons. She says that the French ones look more real than any other false nails she has had before!


Overall, these were totally cute and they were GREAT when I was in a bind and wanted a mani, but wasn't in a place where parfum de polish was acceptable. I will definitely be storing a package of these for the next plane trip I take!

Have you tried false nails before? What do you think of this no-glu alternative?

Happy Tuesday! :)

Monday, May 13, 2013

Crazy for Coupons: May 12 - May 18 2013

So sorry for the lack of posts! My sister had her baby yesterday and I am officially an Auntie! I have been visiting with her and baby Charlie the past 2 days and just haven't had time to post! I have this weeks drugstore deals and steals as well as the rundown of the new Ulta ad for you today!
Click the Retailer to go to the ad!

Revlon Buy 1 Get 1 50% off (BOGO50) and Buy ANY Revlon Nail Polish and get $3 Extra Bucks back (pretty good deal!)
L'oreal Skin is Spend $30 get $10 in ExtraBucks
L'oreal Cosmetics is spend $15 get $5
Buy ANY
Buy 2 NOPI polishes and get back $5 ExtraBucks
Covergirl Lip or Outlast nail and Maybelline Cosmetics are BOGO50
Kind of a meh ad is you ask me unless you have a lemming for any Revlons or L'oreals!

L'oreal Skin, Hair and Cosmetics, Neutrogena Skin, Suncare and Cosmetics, Revlon, Covergirl are BOGO50

BEST DEAL!
Ok, so if you only read one thing in this post, read this:
On the RiteAid website there is a link right on the front page HERE that shows Revlon Nail color and tells you to watch a video for a $1 Off coupon!! Well, if you click that there is a TON of little videos you can watch to get coupons!
There is coupons for Wet n Wild, L'oreal, Revlon Polish and nail tools as well as SH insta gel! Nice!
Covergirl Cosmetics, Revlon Colorstay are BOGO50
Spend $15 on Revlon Beauty tools and get $4 back in +UP rewards
L'oreal Visible Lift Makeup and Colour Riche Lip is Get $2 back in +UP rewards
Physcians Formula is spend $15 get $10 +UP rewards back
NYC is 30% Off

Ad is May 12th through June 1st
Covergirl is BOGO50 with a Free Gift of a Cosmetic Bag!
L'oreal and Neutrogena are also offering a Free Gift with purchases!
NYX, Revlon, Maybelline Cosmetics, Palladio, Physcian's Formula are all BOGO50
Ulta now has these cute little mini polish packs for $4.99-$9.99
NEW
Zoya Summer Stunning & Irresistible and PixieDust collections are now available
Essie Wedding and Essie Neon Collections
OPI Couture de Minnie Collection
Are now all available
CK has a scented summer nail line out

Meh kind of a blah week in the makeup world of ads if you ask me. I will not be shopping for polish this week, but I definitely might watch some of the RiteAid video's to snag some of those coupons for later!

Let's fast forward to Friday, please! :)


Wednesday, May 8, 2013

Indie Review: Polishnv Part 2

Hi! This morning I showed you 2 polishes I received from Polishnv. You can see them HERE if you missed it! Tonight, I want to show you the third one. This one was probably my favorite of the bunch.
See part one HERE.


Here in little Rhode Island, the 4th of July is a BIG deal. We have the oldest and the largest Fourth of July celebration in the country. If you have never held a sparkler, felt the loud boom of fireworks in your chest or got up at 4am to secure a prime spot on the parade route...
well, you need to come down here and visit us!
In other words...Prepare yourself for Red, White & Blue manis leading up to the 4th. Starting now! :)


It is never, ever too early to start planning my mani(s) or outfit for the Fourth, which is why when Renee let me choose which polishes I wanted to review, I needed Uncle Sam!


Uncle Sam is a glitter top coat, 1 coat shown here over 2 coats of CG Snow.
There are several different sized glitters in here. We have Large White Squares, Medium Blue Squares, Medium Silver and Red hexes, along with small red hexes and small white hexes. The neatest thing was the light blue glitter flakes that really rounded this glitter out and made it stand out from other glitters I have seen.


Because it is never to early to start planning Fourth manis, I had specifically picked up Orly Boho Bonnet, having an inkling these might pair well. 
I think they worked perfectly together! I like Uncle Sam even more over the blue!!
I used just one coat of Uncle Sam over 2 coats of Boho Bonnet.


The formula on Uncle Sam was similar to the others. The scent was a little strong and dry time was a longer than average, but it does go away after it dries. Renee tried a new base this time around, which is the culprit. This isn't typical of previous batches. Regardless, it won't stop me from using this glitter again.


 I got a good amount of glitter in just one coat. The big white squares came out easily and I didn't use the dabbing method (unless I wanted to move the glitter).
I used a Salma Hayek top coat over both styles.


You can find Polishnv on Facebook HERE. Renee is always posting fun nail polish facts! Did you know nail polish originated in China and was made from a mixture of beeswax, egg whites, gelatin, dyes and some other things?! I didn't! 
You can check out her other polishes in her Etsy shop HERE.

What do you think? Are you a Fourth of July fanatic?

**Disclosure: The product(s) in this post were provided to me by their manufacturer for my unbiased review. Please see my Disclaimer page for more info**