Wednesday, October 30, 2013

Halloween-Eve Mash Up!

Happy Halloween-Eve! I hope everyone has something fun planned tomorrow night! I will be rushing home from work to slip into my Hello Kitty Costume (again) and will be taking my nephew trick -or- treating. Is he old enough you ask? Not even in the slightest. I am using him as a pawn to shamelessly beg for candy from my neighbors. 
Whateves. 

I had so many Halloween polish reviews that I never showed you much of what was on my nails for Halloween manis! I did Instagram a few -- Follow me HERE!
So I will do a Halloween Mash-up of my favorite looks!


Here is one of my favorite combinations! It was simple and very appropriate for some Fall/Halloween pumpkin picking fun! 
I used 2 coats of Julep Kendra (green), with 1 coat of Carpe Noctem Cosmetics This is Halloween, (orange jelly), over 1 coat of OPI Chop-Sticking to my Story (burnt orange).


Next up I used one of my all time favorite purples! 2 coats of Revlon Not So Blueberry! And it is even scented! <3 I love this one so much!
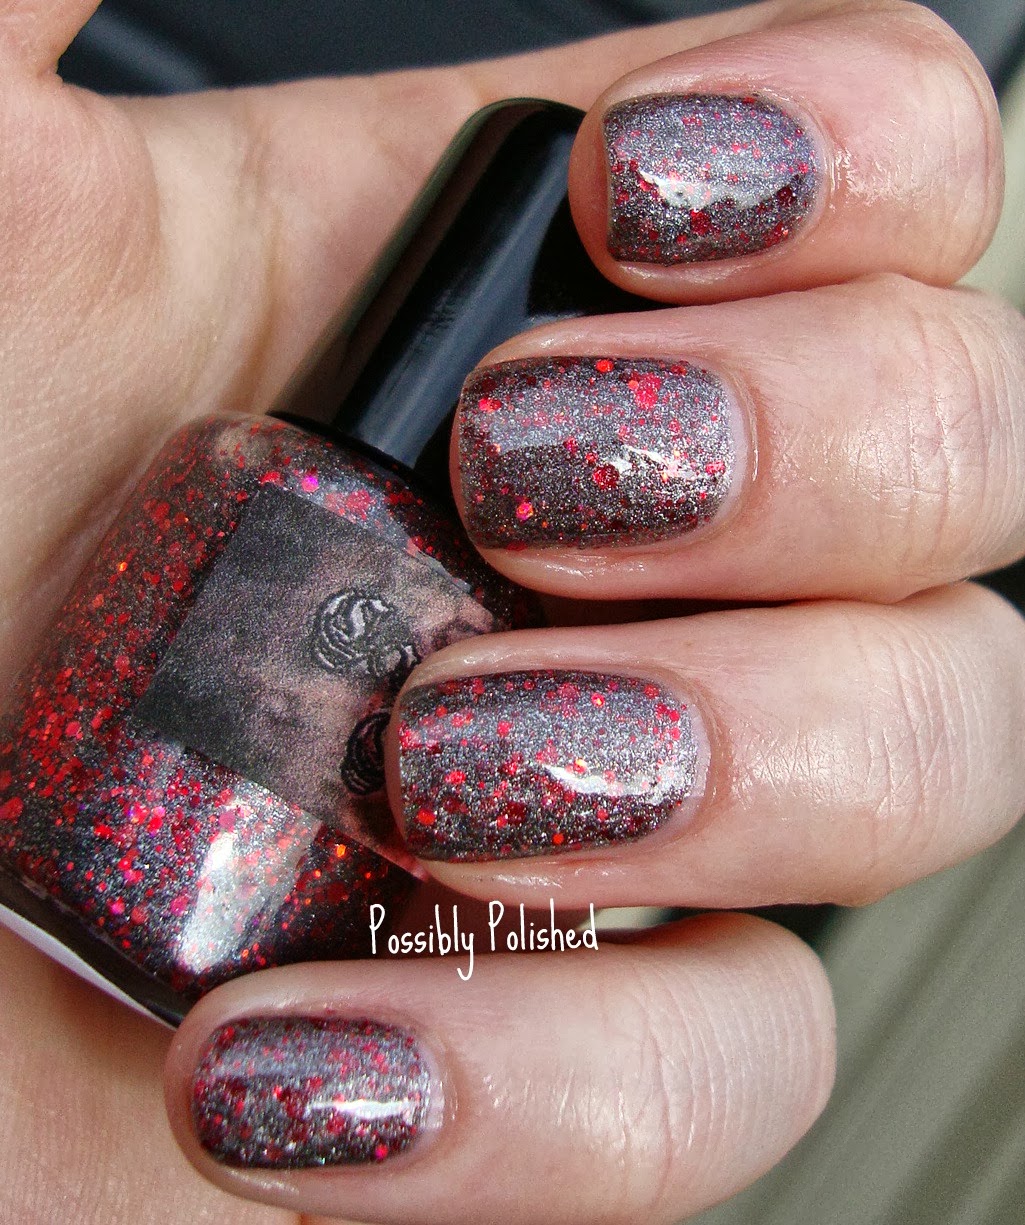
On my accent nail, I have 2 coats of Zoya Raven with 1 coat of Noodles Nail Polish Sleepy Hollow.
I used a paintbrush/dotting tool and ArtClub Stripers in black, white and red for the bats!


These next two looks you have already seen, whether on IG or on another post/review!
I used 2 coats of Carpe Noctem Cosmetics Fright Night and with some Art Club Stripers in black and white, and a dotting tool and toothpick, I created a cute little spider and a web! I really loved this combination! And the CNC polish was just such an awesome find.


For my last Halloween look, I used 2 coats of Spellbound Nails You're a Virgin? with a matte topcoat. On my accent nail, I did a water marble using Zoya Raven and Zoya Thandie. I added some dots using Raven with a dotting tool. Matte top coat over all!

I loved all these looks, but I think the Revlon Purple with the bats was my cutest look!

Which do you like? What are you planning to dress up for Halloween?

Have a safe and candy filled Halloween!

Sally Hansen Base coat used under all manicures with NYC topcoat (unless otherwise stated).


Sunday, October 27, 2013

Indie Review: Impulse Cosmetics Halloween LE

*Purchased by me
*Cruelty & 3-Free
*Impulse Cosmetics

It's almost Halloween!! I went to a Halloween party this past weekend and dressed as Hello Kitty. It was pretty fun and I was very happy with my costume choice and the cutey nails I did to go with it! Follow me on IG @possiblyChrista if you want a peek at my nails!

Tonight I have 2 polishes by Impulse Cosmetics that I stumbled across while browsing Etsy for fun Halloween colors.
First up is Monster Mash.


Monster Mash is a dark purple duochrome that shifts to a monster green! Photo was taken in the shade.


Opaque in 2 coats, this was a pretty cool color! Shown here as 2 coats, with 1 coat of NYC topcoat.


This shade showed a lot of the green shift and not as much as the purple as I would have liked but it was still really neat! Photo taken in direct sunlight.


Next I layered 1 coat of Midori Sour over Monster Mash. I used to love Midori Sours, but I had one the other day and it definitely wasn't as good as I remember it being. I prefer this polish over the real thing :)
Photo taken in the shade.


Midori Sour is made up of lime green, white, black and blue hexes in various sizes. Shown here is 1 coat, over MM with 1 coat of NYC topcoat. 
This is an interesting glitter topper and is totally unique to my collection!


These went pretty well together I have to say. I bet Midori Sour would look great over a variety of darker shades and it gives a little extra edge to a manicure! Photo taken in direct sunlight.

I liked both of these polishes. They went on smoothly and had average dry times. My only complaint is they both had a very strong scent. After a topcoat however, the scent was no longer noticeable.

Are you ready for Halloween this week? Have you picked out fun colors for a Halloween manicure?

You can find Impulse Cosmetics on

She sells mini sized polishes for $3.99.

Thanks for reading!

Tuesday, October 22, 2013

Tips on Tuesday: Halloween Tutorial

Holy schmoley, I have been MIA lately. I have been trying to get my Halloween costume together this week and on the fly last night I decided to make another Tutu for my friend who is stationed in the Bahamas! I have changed my mind a million times on what to be for Halloween but I think I have finally settled it, we will see. I also got a new job and have been tying up loose ends before I move on. Anyway-- On to the Tutorial!

Recently, I asked you all on my Facebook: 
"I'm wondering: for those of you who do not attempt nail art at all (or often), I want to know why you don't?! Do you not have nail art tools or aren't comfortable or do tutorials seem too hard, ect.?"

Many of you mentioned that you don't have the tools for nail art, but just as many of you said you were afraid you don't have the skills. 
I LOVE nail art, and try to bring you easy tutorials/tips as much as I can and I try to go through each and every step, no matter how obvious it may seem!


So today-- I bring you the most foolproof/ mess-up proof nail art I can think of in an easy to follow tutorial for Halloween using an easy to find item!

SHARPIE MARKERS! 
Believe it, because they work. 
And this might be the only time a Sharpie Marker is erasable. 
Yup, you heard me! :)


First I started by painting both of my ring fingers a lime green. I used 2 coats of SH Xtreme Wear Green with Envy. 
I then painted the rest of my fingers with 2 coats of Wet N' Wild Who is Ultra Violet?


Any light shade green and purple will do. Actually--any light colors will do! All you want is for the black to show up. 
Now wait for them to dry, young grasshopper.
You absolutely, positively must wait for them to dry or you will dent the polish and ruin the Sharpie marker. And you will need that Sharpie Marker come Christmas when you need to tag gifts.

Once they are dry -- add a top coat. 
And then wait some more! Muhahahaha.
Sorry, not funny. 
This step is a must if you want your design to be erasable in case of mistakes.

Now, once they are completely dry (if you jumped the gun, I will wait while you start over hee hee), you can move on to the next step!


Whip out that Sharpie Marker!!
I used a Sharpie Pen with a Fine tip in black. I found mine at Target, but I bet you can find it at retailers like Walmart or any Office Supply store. 
The fine tip, will create thinner lines than a regular tipped Sharpie, however, you can also use the other kind too.


Now draw some lines in different lengths. It doesn't matter how many you can fit either! Draw one big one or a couple little ones -- it is all up to you!
The lines don't have to be straight or even, so no fretting. Mine are definitely not perfectly straight or even - and for Halloween stitches, you don't even want them to be either!


Add some "stitches" going across the other lines you just drew. You are basically just crossing T's here!


Add some more "stitches" to finish them out! I went over a couple of my stitches again to make them a little darker and thicker.
So here is the cool part:


If you mess up, or decide you don't like the stitch you made -- just wipe it away!!!
A couple of swipes over your nail with another finger, or simply the edge of a shirt or towel, will wipe the Sharpie right off. For any stubborn smudges or marks -- simply pop a finger in your mouth and rub it with some spit (or a bit of water) to wash it away.

This also means that once you finish your design, 
you have to put another layer of top coat to seal in the Sharpie.
I like to wait a couple of minutes to let the Sharpie marker dry/set before adding a top coat, so I don't smudge it.


I think this design looks super cute! Put stitches on just a couple of nails or on all your fingers!


Easy Peasy!
This design also shouldn't be too hard to do with your left hand, since we are just drawing regular lines and dashes. If you are worried, just remember, you can wipe it right off your nail and start over! :)

Will you try this? Have you used a Sharpie Marker for nail art before?

Happy Halloween my friends!

Tuesday, October 15, 2013

Tips on Tuesday: Waste Not!

I'm going to be completely honest here. I hardly recycle. I recycle at home (mostly because my mom sorts the bin), but at work...my boss is almost always pulling papers out of my trash and putting them into my recycle bin. Shame on me, I know.
I try to remember to recycle, but my excuse is that for a long time I didn't have a recycle bin...now I do and I still can't remember it is there. Anyway, in my efforts to conserve more and waste less, I had to do something about all the top coat goo I have been hoarding.


I have - who knows how many - half filled bottles of NYC and other miscellaneous top coats laying around that I just can't seem to throw away.
What if I need it someday? What if I run out of topcoat and need a half full bottle?
These ridiculous questions I tell myself to justify my hoarding.
So, what did I do?


I poured them into one bottle, added a couple drops of polish reviver, rolled it around and tossed those empty bottles out!


You can tell combining them made the topcoat a bit cloudy and it is actually a lot thicker and sticky, but it still works and is great to have as a backup! I am happy I was able to get rid of a bunch of half empty bottles too!

Do you do this with your topcoats? You can even franken/combine half full bottles of colored polish to create a new color!

Happy Tuesday!


Monday, October 14, 2013

Indie Review: Carpe Noctem Samhain Collection Part II

*Press Sample
*Cruelty & 3 Free


Hello again today! I have the second half of Carpe Noctems Halloween polishes, called the Samhain Collection!
First up, is Reflect.


Reflect* is a duochrome that shifts from blue to teal and to a purple. Swatches show 3 coats ALONE with 1 coat of NYC topcoat. You can find photos of Reflect over black on Potions in Motion HERE! She doesn't say that it is swatched over a black base, but it is, and it looks awesome!
*Reflect is being reformulated to a less sheer version. However, this polish is meant to be layered over a darker base color.


I was kind of meh on this one. In the bottle it is quite lovely but it just didn't build up as nicely as I was hoping on the nail by itself and I didn't see much of the purple shift at all.
Despite Reflect being sort of a dud for me, the rest of this collection was very impressive!
Next up is Divination.


This was a surprise favorite for me. I don't normally like orange shades but I thought this one looked great on me! Divination is a light orange duochrome that shifts to a light reddish and to a sunny yellow.


The red was a bit harder to capture but you can see a light shading of red just off center in this macro shot and around the edges in the first photo.


The lovely yellow shift! It is shown here as 2 coats with 1 coat of NYC topcoat. It built up perfectly! There were some brush strokes, but I think these can be overlooked.
Next up are the 2 glitter toppers in this collection!


This is Reflection in Flames. I loved this topper! Shown here is 1 coat over Loréal Safari Chic.
Reflection in Flames is made up of black squares, small black and orange hexes and holographic glitters. I used 1 coat of NYC topcoat over all.


While this one is great for Halloween, I just might be picking this polish out again to use when the new Hunger Games movie releases in November!!

Last but not least is A Place at the Table.


I layered 1 coat of A Place at the Table over 2 coats of CNC Under Cover of Light, a beautiful shimmery white with 1 coat of NYC topcoat.
I wanted this to look like blood splatters!


I think it does in a bit of a creepy way! This glitter topper is made up of Red squares, hexes and bars in several sizes as well as black hexes and shards. There are hearts in this topper, but I was unable to get any of them out, good news to those of you who are heart glitter adverse! (I am!)

This was a super extensive Halloween Collection, but there were some awesome polishes!
My picks from the Samhain Collection have to be Reflection in Flames because I will definitely be using it again and A Place at the Table for being a creepy Halloween polish!

Will you be picking any of these up? I can see a lot of these polishes going GREAT with a variety of scary-type costumes! A Place at the Table for a vampire, Fright Night for a zombie or otherwise undead character!

Check out the first half of the collection HERE.
And find CNC on

**Disclosure: The product(s) in this post were provided to me by their manufacturer for my unbiased review. I covered the cost of shipping the samples. Please see my Disclaimer page for more info**

Indie Review: Carpe Noctem Halloween Collection

*Press Sample
*Cruelty & 3 Free


Hello! I have a day off today for the Columbus Day!
 Today I have some awesome new polishes from Carpe Noctem Cosmetics! Her Halloween/Samhain collection consists of a total of 8 different polishes, split into 2 collections: Halloween and Samhain. I will have the Halloween collection up first and then the Samhain Collection up later today! There were a lot of surprise likes for me in this collection! Read on to see my favorites!


First up is Fright Night, which you already saw used in some cute 8 legged nail art here.
This is a tough one to describe. 


Fright Night is in a jelly-like base, but is more like a glitter bomb - packed with gray pigment and some spectra flair! My favorite part about this glitter is the red holographic glitters floating around in it like blood. It went on a bit spotty the first coat, but I was able to achieve full opacity with 2 coats. I did use a thicker second coat. Topped with 1 coat of NYC topcoat.


Here I matted it with Sephora by OPI matte. I loved this matted! 
Surprisingly, this wasn't too much of a nightmare to take off! 
It wasn't quite as difficult as a glitter bomb would be to remove.
Next up is Candy Corn.


I like the polish Candy Corn a lot better than I like the actual candy haha.
This glitter topper is made up of yellow, white, light orange and dark orange squares and hexes!
I loved all the different sizes and shapes of glitter.
I swatched this as 1 coat over Julep Valerie with 1 coat of NYC topcoat.


A second coat would have easily added a bunch of extra glitters, but I liked the more subtle look over the green! 
Next up is This is Halloween.


This was absolutely a surprise favorite for me. When I saw this orange, I was shaking my head a little. Orange hardly ever looks good on me! You can see in the bottle, this orange is a light, milky shade. I really wanted to make this pop so I layered 2 coats over 1 coat of OPI Chop-Sticking to my Story, a burnt sienna shade of orange with 1 coat of NYC topcoat.


This is Halloween is a jelly in a light orange base. Suspended throughout are black (and less noticeable green) hexes and squares with a touch of holographic glitter. This went on smooth and evenly!


I loved this one and used it as an accent nail for some Halloween Nail Art. Follow me on IG @PossiblyChrista to see it!

Last, but not least in the Halloween half of this collection is The Blob.


I knew right off the bat this was going to be a cute color! I don't like visible nail line, so I swatched 2 coats of The Blob over 1 coat of Orly La Vida Loca with 1 coat of NYC topcoat! La Vida Loca really made this color nice and bright. It could easily be swatched over a lighter or more subtle pink/purple to tone it down.


BAM! Check out the large holographic dot! The Blob is a magenta jelly with a whole mess of purple matte, holos and metallic glitters. There are also violet, purple and fuchsia dots mixed in! It was pretty tough to get more than 1 of the dots out at a time, but I was able to get at least one on each finger. Which for big chunky glitter, that is best case scenario!

Overall, I absolutely loved Fright Night and This is Halloween. Those 2 polishes were definitely the most Halloweenie for me, and I have used them both in some Halloween themed manicures already. 

You all know that I am a huge fan of Carpe Noctem and I own more of her polish than anyone else's. BUT I like that her polish comes in 3 sizes and is super affordable! 
You can check out Carpe Noctem for yourself on

Check back later today for the other half of her collection!
See the second half of the collection here.

Are you ready for Halloween? Do you have a manicure and costume ready?


**Disclosure: The product(s) in this post were provided to me by their manufacturer for my unbiased review. I covered the cost of shipping the samples. Please see my Disclaimer page for more info**

Tuesday, October 8, 2013

Tips on Tuesday: Lotion up with Curél Intensive Healing

Hiya! I do this fancy pantsy thing called BzzAgent. Sometimes, when the stars align (aka my profile is up-to-date and I fit the criteria and completed all my surveys) they send me free stuff to try out and give them feedback!
You can sign up here.

photo credit to the Google image monster

Just recently I opted into the Curél Intensive Healing hand cream campaign. Not only do I always need a good hand cream, but I am sure you, as my readers, are always on the look out for one too!
At the end of the post I have a before and after look at my nails/hands and fun Halloween nail art using a new polish from Carpe Noctem's Samhain/Halloween line!


I like a good cream because my skin dries out so quickly and I tend to get eczema on my elbows, on occasion, so the Intensive Healing part of this campaign really intrigued me!
I also have a cat who sleeps in my bed, so I need a cream that isn't greasy, otherwise I'll be eating cat hairs and getting them stuck in my eyeballs or mouth on accident all night.
Keep reading to find out if Curél is a lint trap or not!


I was sent a 1 oz pot of lotion to test out with some extra pots that I sent off to some other bloggers!
So why exactly is this lotion unique?
It helps stimulate the production of ceramides, which are the protective barrier that helps "glue" the surface skin cells together. When this protective barrier is compromised, your skin is more susceptible to dryness!


Curél Intensive Healing is fragrance free and hypo-allergenic. I like it when hand creams are unscented, as I put my hands near my face and mouth a lot too much and sometimes the scent starts to bother me. This cream looks like a whipped body butter in the canister, but is actually nice and thick!


It does go on seemingly sticky and greasy, however it is REALLY FAST absorbing! 
No kitty hair for dinner tonight!
For just a few minutes it feels like there is gak on your hands, but after it transforms your skin into a silky powdery feel. The only thing I didn't really care for about this cream, is that is comes in a canister. I prefer a squeeze tube, because the lotion won't get stuck under my nails that way. It is also on a expensive side. A 16oz canister will run you about $10-$12, even when purchased at Walmart.
Although, for those of you who suffer from eczema know that some creams do and don't work, and finding one, even if it is expensive, is a lifesaver!!

Since this is a nail blog I obviously had to squeeze in some nail art! I have a before and after comparison of my hands and cuticles after using Curél hand cream!


Before. 
You can see that my fingers are especially dry, showing a lot of my skin cracks and my cuticles are looking a little flaky around the edges.


After.
My fingers definitely look improved from the before photo and look a lot smoother. My skin also doesn't appear shiny and tight looking, like the before photo.
I have also been using this cream on my elbows to ward away any unwanted eczema! It took a few days, but my elbows are feeling a lot smoother than they were!

Overall, I enjoy this hand cream but I do wish it was in a squeeze or pump container and that the price point was a little lower. Unfortunately, when I am in the market for another hand cream, I might opt for a more budget friendly and more favorable container option over this one.

You can find Curél on:

I also have several $2 off Curel Intensive Healing coupons up for grabs! 
Message me on Facebook if you want one!

Polishes used in this post:
Carpe Noctem Cosmetics Fright Night 
Art Club Stripers in black and white.
Sephora Matte topcoat
Wet n Wild Glow in the Dark top coat

**Disclosure: The product(s) in this post were provided to me by their manufacturer or Bzzagent for my unbiased review. Please see my Disclaimer page for more info**


Monday, October 7, 2013

Indie Review: Noodles Nail Polish

*Purchased by Me
*3 Free & Cruelty Free
*Noodles Nail Polish

Sometimes I go on Etsy and just search for Holiday Nail Polish. Or Halloween nail polish, recently. Othertimes, I might just type in green glitter nail polish and see what pretties appear before my eyeballs. This was one of those aforementioned scenarios when I stumbled on Noodles Nail Polish.
The photos of Sleepy Hollow were stunning and I wanted it.

You can see in her shop photos of Sleepy Hollow over a dark purple base. I have it here over a light green and a dusty purple brown. You decide which your favorite view of it is!


Lovely Macro shot of Sleepy Hollow! Sleepy Hollow is a glitter topper made up of purple, black and orange hexes, sprinkled with small holographic glitter and even silver moons!


I paired this over 2 coats of OPI Stranger Tides. 


I got a fair amount of glitter in just one coat. The brushes on Natalie's polishes are the nice thin kind. I tend to like these types of brushes because I have small nails and a small brush is easier to create clean lines. I used the blob and spread method here, which worked the best having a smaller brush! 2 thin coats would also do the trick.


The silver moons were a little tougher to get out of the bottle, but not impossible. I store my indies upside down and I recommend letting this one hang out that way for a couple minutes.
I think the green really brought out the purple and orange glitter. I just love purple and green together though!

Next up I paired 1 coat of Sleepy Hollow over 2 coats Revlon Stormy Night. Which if you don't already own, is one of my most favorite shades ever and is my go-to for Fall and winter.


This looks so great over a darker base color.


Overall, I really loved this topper and it is so perfect for Halloween. It captures the Halloween spirit perfectly, without being too dark or daring for those of you who steer clear of bold and loud polish.

You can check out more of Noodles Nail Polish on

Head over and like Natalie on facebook for an exclusive discount code!

Do you purchase Halloween themed polishes or will you be working with what you have?