Sunday, March 31, 2013

Essie Resort 2013 - In the Cab-ana

Happy Sunday & Happy Easter! I had candy for breakfast this morning!
Today I have one of the new Essie polishes from their Resort 2013 collection to show you. 
I've been super drawn to blues and greens lately so I picked up In the Cab-ana.


In the bottle, this looks like a light sky blue, but on my nails it appeared more turquoise to me.


Here it is outside in semi-shade.
I love Essie polishes, because they have AMAZING shades and some of the
 best blues and greens I have ever owned.


The formula on this one went on a little patchy, which I find is pretty typical of Essie polishes. However, it was opaque in two coats and went on smoothly. The brushes on these polishes are a little small, but this makes it easy for neat nail painting.


This photo shows how light blue the polish can sometimes appear.
I find the wear on Essie is pretty good, normally lasting me 3 full days 
with minimal tip wear and no chipping. 


I decided to spice this mani up with one of my other favorite Essie shades.
I used Boxer Shorts to sport some color blocking on my accent nail. 
Boxer Shorts is a periwinkle, rich purple-leaning hue. Opaque in 2 coats.
I love how complimentary these 2 shades are!
Come back on Tuesday for a Tutorial on how to get this look!
Tutorial HERE.

 I got the inspiration for these colors from my favorite makeup bag by Sonia Kashuk from Target.
 I use this bag to store all my Nail Art paints!

Sonia Kashuk® Dot Print - Double Zip Foldover

Thanks for reading!


Thursday, March 28, 2013

Peep Peep! It's Easter!

I love Easter. Mostly because I like Palm Sunday the weekend before, pastels and candy. 
Definitely candy.
I did an Easter/Pastel post a couple weeks back (I was too excited), 
so you'll be seeing something different on Sunday. 
Maybe. 
You can see my other Easter Mani HERE.


I've been dying for You're Such a Budapest from the OPI Euro Centrale collection and here she is! 
I love OPI, but I was a little disappointed this time around. Budapest was very patchy and it took 3 coats to achieve opacity. However, what you see here is my mani after THREE days. No chipping. No tip wear. That is why OPI is my favorite. 


You're such a Budapest is a light, periwinkle, pastel Purple. 
There are very small glitters in it, but they are hard to see. I couldn't capture them on camera.
I used 2 coats of Loreal I Will 
and SH Hard as Nails, Hard Lemonade for my cute little chicki!
Topped with one coat of NYC.


To make my chick, I taped off a section of my nail with Scotch tape and painted one color at a time. I added the eyes and beak after it had dried! He's so cute, it is going to be hard to take him off! 
He is like a pet now! :)

Do you do fun manicures for Easter? What is your favorite holiday?

Happy Easter!

If you enjoyed this post, please take a second to like it! Thanks!


Tuesday, March 26, 2013

Tips on Tuesday: Nice & Neat Painted Nails

I've been asked how I paint my nails neatly and I want to show you how I combat cuticle flooding, sheet imprints and some tips and tricks I use to get my nails picture ready! Please bear with me as thinking about how I paint my nails isn't something I do too much anymore! This post is wordy and picture heavy.
-- Sorry in advance! --
I found this awesome picture on Pinterest on how to paint your nails neatly, and when I sat down to paint my nails consciously, this is exactly what I do:


Those are the basics.
But let me take you through some of the steps I go through to clean up nails with lots of stray polish!

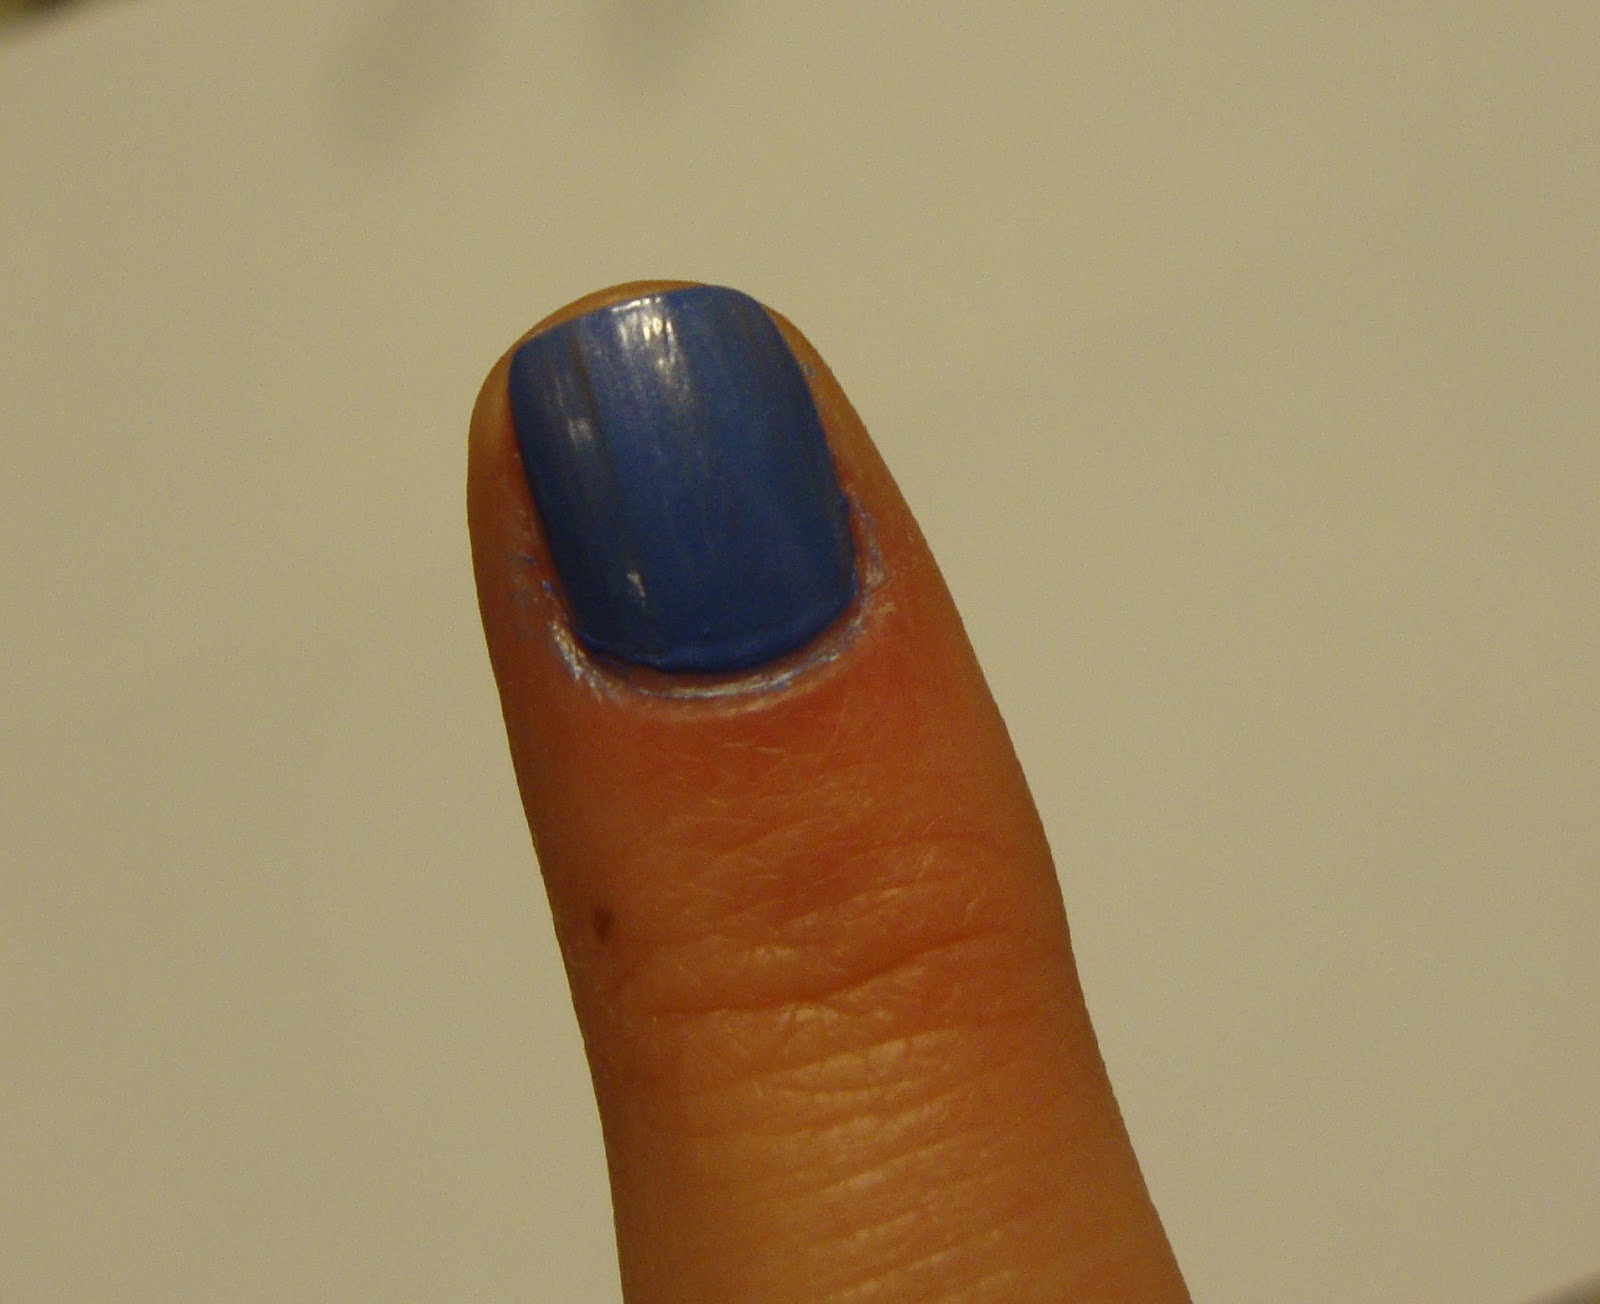
This is what we are striving for! Clean lines, no cuticle floods and no fly away polish!

First off, I always use a base coat, even when I don't mention I do in a post.
See my post about why HERE. 
I most often use 2 coats of polish, and then one coat of top coat.

Some of the things that I think are important to know about painting your nails:

1. GO TO THE BATHROOM, Turn on the TV, feed your cat, put your hair up, BEFORE YOU START!
2. Always paint your nails on a dry, flat and level surface. Sitting on the floor, painting with your hands on your knees, isn't going to help you achieve neat nails.
 3. Wipe any excess polish off of the brush before you start painting each nail. You don't want to put a huge glob of polish on to your nails because that is when it can get messy!
I do one full swipe against the bottle on one side of the brush and half a swipe on the other side leaving just a pea sized amount on the end.
4. Dipping your brush back into the bottle of polish after EACH nail helps keep the polish fluid and flowing and keeps it from getting sticky and hard to paint. 
It is important to remember, that sometimes the brush or the formula of
 that particular polish just might be pretty sucky, causing polish to get everywhere.

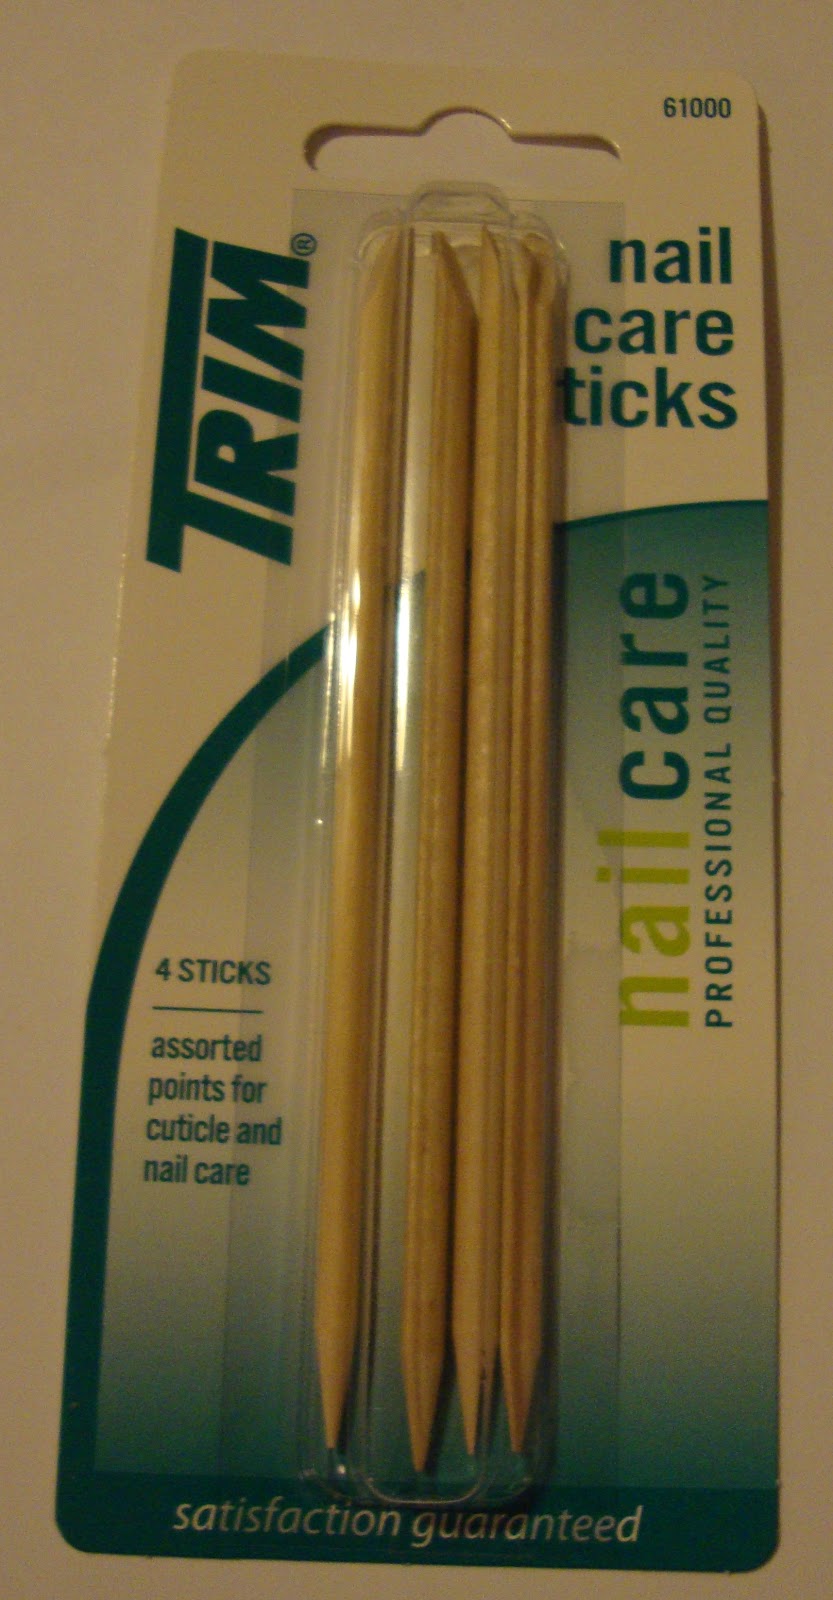
I will eventually do a post about cuticle care, but I want to show you just a snippet of what I do to prep my nails.


These wooden cuticle sticks are my best friends, even though I lose them and leave them everywhere. 
Thank goodness they are only $1.09 at Target! 
I start by pushing my cuticles back away from my nails:


To work against flooding my cuticles with excessive polish, I try to stay about this far away from my cuticle line:


Pretend there is an imaginary line preventing you from backing your polish all the way up against your cuticle. We are avoiding THIS:


AHHH! 

So now what?!
When this happens, which is does, I grab my best friend and 
use the flat end to wipe away the excess polish:


Firmly push the cuticle stick along the edge of your nail, effectively wiping up the extra polish. Some polishes can be watery...repeat this step until the polish stops flooding!
(Tip: A toothpick can be used for this step!)


Use the cuticle stick to clean up excess polish in the cuticle line, 
straightening out the base line as you go.
(TIP: Wipe the stick on a napkin or towel after each swipe to clean it off.)

Pretty close to be being perfect!

When you add your second coat try to follow the line you have outlined for yourself at the base.


 There will be some extra polish hanging around like in the picture above but that is SO easy to remove! You might read that some ladies like to use a paint brush dipped in acetone to clean up around their nails. 
I don't do this very often. 
I like to use the shower method!
:)
The Shower Method you ask?
Wait until your nails are dry, overnight or at least a TV Show or two, then hop in the shower! After you shampoo and condition your hair (this is going to get a bit of the polish off), gently scrub or rub around your nails to remove the excess polish. 
Voila!
However, if you were in a polish and go mood, 
a Q-Tip dipped in remover can help remove the excess polish!


Right Hand First Tips:
My sister and my mom like to paint their right hand first, and then paint the left. I never got into the habit of doing this, but it helps them a lot! My sis feels that if she paints her right hand first it is easier and she doesn't worry so much about struggling to paint her right while not messing up the nails she just did on her left!
Makes sense!
I wish I had more tips for painting your right hand, but it just takes practice! GO SLOW!
There is a reason I only show you my left hand online :)
Another quick tip I want to share is combating 
SHEET IMPRINTS!

If you are like me, you most often polish at the end of the day, seemingly, right before you are ready to hop into bed. Maybe you are already even in bed!
 I try so hard to sit still and wait so I don't smudge any of them, 
and sheet imprints make me so mad in the morning!

So here's the trick! 
Save the clear top coat until the morning! 
Any sheet imprints you have will disappear with one quick coat and then you're ready to go.

Hope this helped and I didn't lose you half way through!
Happy Tuesday!


Sunday, March 24, 2013

Quick, Look! A Chameleon!

I love animals and it is a complete bonus that this new Limited Edition line by Revlon is called Chroma Chameleon. I first spotted it at a Walgreens and since I was running errands for work, I resisted the urge to make a purchase. I was so sorry I did, because 2 Walgreens later and I still hadn't seen it again. 
Luckily, I HAD to go to Ulta and I found it there!!! 
Enough talking, let me show you which I picked up!


I chose Tanzanite. It is a duochrome, color shifting, polish. This polish is bright purple in person, but has a rosy gold, brown shift. 
Photo was taken outside in direct sunlight.


Here is what the purple looked like inside the house in natural light. The purple is a bit deeper and brighter than is actually shown.


This photo shows the shift in the purple and my thumb shows the actual purple.
Tanzanite went on pretty well. The formula was a little thin, but went on smooth and without streaks. The first coat was very sheer, but the second made it mostly opaque. I used 3 coats with a top coat of NYC.


Shift Close up


Shift inside the house in natural light.

I really like this polish. It is actually very beautiful in person and even though it seems dark in the bottle, this particular shade is bright and perfect for summer. I can't wait to paint this on my toes!
I also swatched this on a swatch stick over black, which made the purple much more bold.

I paid $7.99 for this Chroma Chameleon at Ulta, which was a bit much, 
considering it is a mini at only .29oz. However, I have read on some blogs that it is retailing for $5.99 other places and has also been spotted at CVS and some Bed Bath & Beyonds. 

CHECK FOR COUPONS 
&
Keep your eyes peeled!

Are you going to try to snag one of these polishes? What are your thoughts on duochromes?

Thursday, March 21, 2013

To bead or not to bead?

Hello! I have a fun new mani to show you today! 
I found some caviar beads/ Nail Pearls at Rite Aid a couple weeks back and I have been holding on to them trying to decide if I would actually ever try them. I always viewed it as one of those ridiculously 'posh' nail trends, that isn't for me. Well, I was a little wrong about my assumptions.


I actually ended out REALLY loving it! I paired the Nail Pearls with 
Barry M textured polish Kingsland Road
(Which is actually ballet pink. Here it appears a bit peachy.)
The beads gave it a very textured feel, just like a textured polishes and had small ballet pink beads mixed in with the dark pink, making the pair perfect! 
The Nail Pearls also come in mixed blue, and a sort of 'birthday cake' mix, with bold colored beads.


Unfortunately, the beads didn't last long. The directions said to use 2 coats of polish. Just after the second coat, wait 20 seconds, pour the beads on, wait 20 seconds more and press lightly on them to adhere them to the polish. Then wait 20 minutes for them to dry completely. 
In due diligence, I followed the directions very carefully. 
(I'm not a rule breaker!)


I had a feeling they would all come off in the shower. Which they didn't, some did, but not enough to ruin the look. The colors did bleed a little though.
In fact, the beads actually lasted the whole day, until I picked them all off.


Overall, I thought this mani was so cute and even though the beads didn't stay on very long, I will probably be experimenting with them some more!

Happy almost FRIDAY!

If you enjoyed this post, please take a second to like it! Thanks!


Tuesday, March 19, 2013

Tips on Tuesday: Easy 5 Petal Flower

Hello! It's Tips on Tuesday again and just a day away from the first day of SPRING!
I recently posted a question to all my fans on Facebook on what kinds of things you would like to see on Tuesdays and a Tutorial on Flowers came up! 
I love love love flowers and you will probably be seeing them a lot on my nails in the Spring and Summer months. And I wanted to share how I make these! 


I am going to be showing you step by step instructions on how to make the above
Easy 5 Petal Flower.
This flower doesn't need any fancy or special tools to make and is great for beginners!! 
I usually use a dotting tool for flower adornment but for this tutorial I used a Bobby Pin in hopes it is something all of you have around the house.


Make sure it is a Bobby Pin that looks like this with the thick nubs on the ends. You will want to bend it apart so that it is straight. If you don't have a Bobby or just can't find one, 
a pen or pencil will work fine!

***
First you will need to paint your nails as you normally do and wait for it to be mostly dry.
Then choose your Flower colors! 
You will need one color for the petals, and another color to dot in the center of the flower. 
For this flower I used Color Club: Art Club in White. I dotted the center with SH Xtreme Wear in a mini unnamed bright orange.
Now you're ready to start your flower!
Lets Get Started!!

1. Get your Flower Petal polish ready by dripping some onto a piece of foil or a paper plate.
(Watery or Sheer polishes are not good for flowers.)

(TIP: If the polish starts to get goopy or dry as you are working, just drip some more onto the plate!)

Then you are ready to start your flower!


(Sorry that it is backwards on my nail, I didn't realize it until later!)

 2. Dip one end of your Bobby Pin into the white polish and make one dot on your nail.
This is going to be the center of the flower, so make sure to leave room for the petals to go around it by placing it away from the edge of your nail.
You only need a little bit of polish on the end of the Bobby if you want a small dot. The more polish you have on your Bobby, the bigger the dot will be!

(TIP: Try a couple practice dots on the back or palm of your hand first!)

3. Make your first petal by attaching a second dot to the center dot.

(TIP: Dip your Bobby Pin into the polish after each dot!)

4. Make a second petal next to the first, creating a sort of Mickey Mouse face.
It is OK if your petals touch! :)


5. Add a third petal. Keep your petals close, you will want to fit 5 in total!

6. Add a fourth petal 

7. Finish your flower by adding the fifth petal! Yay!


8. Wait a couple of minutes for the flower to dry and then complete it by 
putting the colored center in!

You can add more flowers to this look like I did, by repeating the first set of steps, but instead placing your center dot right next to the edge of your nail and stick your petals on around it. 

You can add as many flowers as you want and in all different colors! The possibilities are endless!

What do you think? Did this tutorial help you? Will you be trying this out? Do you want to see more tutorials like this?

HAPPY SPRING!

If you enjoyed this post, please take a second to like it! Thanks!

Sunday, March 17, 2013

Hard Candy Review Part 2!

Welcome back! 
I only have one more Hard Candy Polish to show you, but I loved it so much, it needed its own post. 
When I was agonizing in front of the Hard Candy Display:

WOULD YOU BE ABLE TO CHOOSE?!

I spotted Black Tie Optional from the Crystal Confetti collection. I have been wanting a black and white glitter so hard since I started seeing them flutter around on the Internet in all their black and white glitter glory and knew I just had to have this one.
I loved it so much, I even went back today to snag another but they were all out! :( 
Anyway, read on to see all the different ways to wear this!


First up, I tried this glitter over some bright Wet & Wild Neons. I love Neons and I am totally looking forward to summertime when I will definitely be using up the entire bottle of Black Tie Optional over every neon polish I own.
Shown from Left to right is Wet & Wild Straight A Jesse, Nerd Alert: Screech, Pom Pom Kelly and Pin' Em Slater. Two coats of each polish. The yellow, Pin' Em Slater, was one of those neons that needed a white base coat to see the color well. I use one coat of Revlon Sheer Cotton to make it nice and bright! I used one coat of NYC over all.


Black Tie Optional has lots of little black and white glitter pieces, with sticks and several larger hexagon pieces mixed in. You can see the largest hex glitter on my middle finger (that's not a light reflection! That's a huge hex! Awesome!). The clear base was not too thick and one generous swipe covered my nail in the glitter. I didn't get many of the larger hexes but it still evened out perfectly. The white glitters have just a subtle shine to them that make them look oh so pretty!

Next, I tried this glitter over some pastels. Wow-Oh-Wow!!


Slightly reminiscent of Illamasqua's Speckled polish line, but better looking in my opinion (plus you get some extra dollars to keep in your wallet with Black Tie).
CUTE CUTE CUTE!


I wore Black Tie over, (left to right), Sally Hansen Xtreme Wear in Mellow Yellow, SH Xtreme Wear in Mint Sorbet, Confetti in Dance Party Pink, Zoya in Blu, and SH Xtreme Wear in Lacey Lilac. Two coats of each, topping it all off with NYC! I am going to be wearing this mani for the rest of the week!
This is so perfect for Easter!!

Check out Part 1 of this post HERE.

What do you think of this glitter top coat?

Hard Candy Review! Part 1

I hope everyone enjoyed their weekends and any St. Paddy's Day festivities!
Please note this post is photo heavy!

I have some beautiful swatches from the new Hard Candy line, found exclusively at Walmart for only $3.98, to show you today! 

First up is Piece of Papaya from the Itzy Glitzy collection. 


I LOVED this color. Piece of Papaya was a rosy pink with lots of fine gold glitters mixed in. 
The photos show it to be very pink, but in real life the gold glitters showed up very well and gave the polish a nice shine. 
The formula wasn't too thick and it brushed on very smooth. I have to say that the brushes on these polishes were AWESOME. They were just the right width without being too small.
 I also like it when the stem of the brush has flat sides, which these did, so it is easier to wipe excess polish off the brush.


This photo shows the gold undertones a little better and is closer to what the color actually looks like.

I used 2 coats to achieve total opacity with one coat of NYC In a NY Minute. 
I found this polish to be a little top coat thirsty 
and to add some extra shine I might have added another coat of NYC.
Removal was not so fun on this polish. It wasn't as difficult as a heavy glitter polish, but it was one of those polishes that gets little tiny glitters EVERYWHERE. My hands were covered in glitter after removal. I will definitely use a PVA base next time I wear this. I can see myself wearing this alot in the summer.


Next up is Crush on Amethyst from the Crushed Chromes collection.


This polish was  a nice purple with silver undertones. It was a bit thicker than Piece of Papaya but not to the point where it made it hard to work with. It was opaque in one coat, but I used 2 with a top coat of In a NY Minute.


The brush on this one, again, was awesome! You can see the silver undertones perfectly in this photo, taken outside! The neatest thing about this polish was when I removed it:


I wore this polish overnight, and when I took it off in the a.m., the purple removed with just a swipe or 2 of a makeup remover pad and left behind this silver foil base! I actually love the look of this! It reminds me of tin foil and has a neat looking texture to it. You can see that my thumb still has the purple and the rest of my fingers have had the purple swiped off. To remove the silver, it did take a little longer than normal polish and took a little more pressure, but wasn't a remover-pad-shredding kind of nightmare.

Next up is my favorite, Crush on Pink, also from the Crushed Chromes collection.


Crush on Pink is a light pink, with the same silver undertones. I thought this one looked the best on my skin tone and is perfect for spring! I really really liked this polish. It went on nice and smooth and was opaque in 2 coats. Like the other 2 polishes it was pretty top coat thirsty but it was beautiful with just one coat of NYC.


Here it is in the shade. Isn't she a pretty one?!
I didn't wear this one over night, but it removed just the same as Amethyst and definitely had the same silver foil base.

I am wondering if the Crushed Chromes polishes will be good for stamping. Let me know if you test any of them out!

What do you think of the polishes from this new collection? Have you tried any of them out yet?

I also picked up Black Tie Optional from the Crystal Confetti Collection! I will be posting a Part 2 specifically to review that pretty!

Check out Part 2 of my review HERE.


Wednesday, March 13, 2013

Luck O' the Irish to yah!

Happy Wednesday!
This week I am showing my Irish pride by sporting a green themed 
mani for St. Patrick's Day! I wanted to go with something festive and fun!


When I was planning this post, I discovered I do not own any opaque Gold glitter polishes. 
Not -a -one! 
So sad, because I really wanted to use a super glittery gold polish on my accent nail, 
but I had to do with what I have!


What you see here is Essie Mojito Madness, my favorite green ever!
I am not much for glitter polishes, since removal is a total nightmare, 
so I used a base coat of PVA glue on my accent nail for easy 'peel off' removal. 
(Check back soon for a Tips on Tuesday about using PVA Glue!)
My accent nail is OPI Designer...De Better! which was a bit more silver than I had hoped. 
I layered 2 coats of Essie As Gold As it Gets on top to achieve a gold coin shade! 


I think I got pretty darn close!
Happy St. Patricks Day!

What are you wearing for St. Pats? Post your mani's to my Facebook wall and show them off!

Thanks for reading! :)


Tuesday, March 12, 2013

Tips On Tuesday: Using a Basecoat & Topcoat!

Happy Tuesday!
So what is the big deal with using base coats anyway?
There are a ton of base coats out there that do a variety of different things. Some base coats will help strengthen or harden weak or thin nails. While others will heal dry, brittle nails and prevent splitting and peeling. Others can help your nails grow faster. There are even base coats that will fill any ridges you have in your nails, smoothing out the surface.

Using a base coat protects your nails from the nail polish and will help prevent staining. St. Patricks Day is coming up this weekend and those of you sporting green polish without a base coat might end up with an interesting shade of green stained nails afterwards. Eek!

I have tried a ton of different base coats but my fall back is almost always 


One coat does the trick and drying time is so quick!
If you polish your nails as often as I do, you will be finding you'll run out of both your base coat and your top coats pretty fast. Because I think using a base coat is so important, I often will skimp on spending too much on a top coat. Which is why my top coat of choice is 
NYC In a New York Minute.
This Top coat is seriously the best top coat I have EVER had. At $1.99 it is a total bargain to boot!


The NYC Extra Shiny Top Coat also works pretty well. This one is only $0.99!


While Base Coats protect your nails, top coats protect your manicure and keep it looking shiny for longer. I find that using a top coat helps prevent against chipping and will all around keep your nails looking nicer.
Don't forget, the key to nice nails and a long lasting manicure is using a moisturizer in addition to your base and top coats!
:)