Tuesday, July 30, 2013

Tips On Tuesday: Recycling an Old Trend

Tips on Tuesday woot! Tonight I will be showing you how I brought back an old polish trend!
Remember those Sally Hansen Salon effects nail polish strips? They were pretty popular a little while back and I still happen to own a good handful of them. I like a lot of the designs on them but I just never end out reaching for them when I go to do my nails. 


A couple of weeks ago, I shared the above mani on my facebook page! I am really loving this glitter gradient with Color Shows Polka Dots in Clearly Spotted over Orly La Vida Loca.


Then I remembered my SH Salon Effects nail strips in the black and white flower design. Gahhh! Instead of using the whole package and doing all my nails with the strips, I simply just did an accent nail to go with the mani I had on! I am liking how this came out. Even though the nail strips might not be that popular anymore--I think the black and white design is totally on point for summer!


I thought this design might be a little too loud for all of my nails, so I am pretty happy that I could repurpose it as just an accent nail. 
I find these nail strips a lot on markdown at Ocean State Job lot, for as little as $2 for a 2 pack sometimes. They aren't very tricky to apply and do last a couple of days. I used NYC top coat over all my nails to seal in the glitter and the nail strip.

I am wondering if I can cut some of my leftover strips into strips and do some funky designs...hmm...

Do you have any of these polish strips laying around? Have you ever used them just as an accent nail?

Happy Tuesday!


Sunday, July 28, 2013

Sunflower Sunday

I guess the heat wave is over because it has actually been a little cold here. And rainy. Definitely very rainy. I keep seeing sneak peeks of all the upcoming Fall collections--and while I don't even want to think about summer being almost over--I decided to pull out an autumn color today.

I used Julep Faye from the California Coast collection box as a base for some sunflower nail art. You can see a full review on the Julep Cali Coast Collection HERE.


I used 2 coats of Faye over a SH base coat.


The flower that inspired me! :)


I impressed myself with the sunflower detail because I really had no idea how this would end out turning out. I used a small nail art brush variety of colors for the flowers and I will list them below.


Polishes used: Sinful Colors Anchors Away (orange), Color Club Almost Famous (yellow), Art Club striper in white, Color Show Onyx Rush (black), and Orly Mint Mojito (green).

Friday, July 26, 2013

Paisley Stamping

Hello! Super quick post this evening because I am dancing out the door to see Taylor Swift at Gillette Stadium! Woo!


These are the nails I decided to wear to the concert! I wanted to do something colorful and on trend!


I used 2 coats of OPI My Vampire is Buff as a base. And using a Red Angel stamping plate, I stamped Essie Watermelon (pink), Essie Avenue Maintain (blue) and Zoya Thandie (orange) over the white.
Ignore the green pinky--haha, I tried to stamp Essie the More the Merrier and it didn't turn out how I hoped.


I put a thin coat of Essie Pure Pearlfection over the design for some sparkle and used Out The Door as a topcoat. I am trying Out the Door for the first time and so far so good!

Happy Friday loveys!


Monday, July 22, 2013

Indie Review: The Lady Varnishes

*Polishes provided at a discount for review
*3-Free and Cruelty Free

Hiya! How about tomorrow, instead of Tips on Tuesday--We have a giveaway? Sound good? :) All you lucky blog followers are the first to know!

Tonight I have 2 more polishes from The Lady Varnishes to show you! Last night I showed you my favorite, A Tree's Love with some cute tree nail art! You can check it out HERE.

First up, I have A Real Magician. Gosh I love that name for this blue! And check out that cute little star charm! I know, such an original idea--and every bottle comes with one!


A Real Magician is a deep blue with shimmer flecks and large teal and turquoise holo hexes! No fake magicians in these parts!


Here is a close up of one of my swatch. Shown here with 2 coats and a coat of NYC topcoat. I really like how all of The Lady Varnishes polishes appear squishy--without being too much of a jelly polish.


I do store my indie polishes upside down, and as such, I had no trouble getting any of the larger glitters out of the bottle. Even if I didn't get too many glitters with the first coat, I was able to layer some on with the second coat. 


Bottle shot! I think this shade of blue is really popular right now, and Kirsten's take on this classic color is awesome! It is the perfect shade of ocean water in the summer, but this is definitely a knockout fall and winter shade too. A must have in my book!


I was really channeling the darker colors when I order from Kirsten, as you can tell! Up next I have The Secret Keeper (Mr. Rochester)
Now this is a vampy purple. My Kind Of Color!


My Rochester has a sprinkling of silver shimmer with 2 sizes of silver holo hexes. Beautiful. Shown here is 2 coats with one coat of NYC topcoat. 
This color reminds me of OPI Vampsterdam, one of my all time favorites! 


Here we are in the shade! I am really loving these polishes and Kirsten certainly has polishes for every day, time, or season of the year! She has SO much to choose from, I would be surprised if you couldn't find one you loved! You can ever choose to have your polishes scented!

You can check out The Lady Varnishes' shop HERE and head over to like her on Facebook! She is always posting swatches of new collections that are sure to create some lemmings!


Sunday, July 21, 2013

Indie Review: The Lady Varnishes A Tree's Love & Nail Art

*Polishes provided at a discount for review

So...I have been very bad. A reader posted this tutorial to my wall by the Lacquerologist on how to make tree nail art. A lightbulb went on in my head and I thought that no other polish except A Tree's Love by The Lady Varnishes would be acceptable. Then my heart sank as I realized I never posted these swatches after I received these polishes weeks ago. 
So many apologies to Kirsten!


First up is A Tree's Love, a bright grape purple with large shimmer flecks, holo microglitter and various sized perwinkle, fuchsi (!) and violet hexes. My kind of color!


Gah, I love this color. This is definitely my favorite out of the 3 I picked up. Each one of The Lady Varnishes polishes, come with a cute dangling bottle charm!


A Tree's Love went on a little patchy with the first coat, but it evened out nicely with the second. I stored this polish upside down and I gave it a good shake and roll before swatching. I didn't have any trouble getting a good amount of glitter on the nail.


I wanted to do the Tree nail art I mentioned above, so I followed The Lacquerologists tutorial here. I started with a base of Revlon Sheer Cotton, and sponged Essie The More the Merrier and Confetti Moonstruck onto the base to start my tree. Using a striping polish, I created the base. I used Layla Ceramic Effect 44 for the pink dots. I love how this came out!


A Tree's love in the shade. Here the polish looks a little vampy. I love vampy purples -- which is probably why I love this shade so much!


Bottle shot! 
o.O check out those fuchsia hexes.

You can find The Lady Varnishes on facebook HERE and her Etsy shop HERE. She has dozens of polishes for every single one of your moods and I would be surprised if you couldn't find a color you'll love! You can also choose to have your polishes scented!!


**Disclosure: The product(s) in this post were provided to me at a discount by their manufacturer for my unbiased review. Please see my Disclaimer page for more info**

Tuesday, July 16, 2013

Tips on Tuesday: Summer Trendy

I am a mess today. If you follow me on facebook, then you should have already assumed ToT would be late tonight. I started off the day by galavanting gracefully into work 
<insert clinging to my belongings, whilst sweating bucketloads> 
wearing 2 different shoes. 
And I don't mean different as in one black and one blue. I mean this happened:


Yup. Don't even ask. That gold shoe--I have absolutely NO idea where the other one actually even is! So how just one of them ended up walking out the door with me--I don't even know. I was wearing a green dress. The gold matched.

Wearing 2 different shoes is totally not in right now, but apparently, White polish is!
I read in InStyle Magazine that white polish was 'IT' for summer. I tried out one of my white polishes to see if I could rock it!


I used 2 coats of OPI My Boyfriend Scales Walls and 2 coats of Layla Softtouch 01 on my accent nail. All over a SH basecoat and one coat of Seche Vite Top Coat. <---NOT my regular top coat. I dislike Seche Vite.


I wanted to love this. I saw this same look on a girl at the baseball game I went to on the 3rd of July and it looked so so pretty on her. I don't think it looks as good on me as her though! My mom told me this look "wasn't my usual pretty polished look" and that it sort of said 'middle-school' ish to her. I get it, maybe it's because it sort of reminds me of white-out.


Anyway. I guess it is sort of cute. Maybe it needed some glitter. Or an NYC top coat.

What do you think of this trend? Would you wear white polish? Have you ever left the house with 2 different shoes on?

Happy Tuesday! 
Thankfully tomorrow is another day and I will take more time selecting my shoes.


Sunday, July 14, 2013

Color Show Holographics?

Hello! I see we have come to the end of the weekend :Super sad face: 
At least I got all my laundry done. i.e. it made it from my room, to the washer, then to the dryer, then back into my hamper. 
I hate folding.
Least favorite thing. Ever.

So a weekend or so ago, I spotted a new Color Show Display in CVS that boasted 
"HOLOGRAPHIC EFFECT" all over it.


I love holo's and I am not kidding you when I spotted this over the top of the aisle from half way across the store. Upon closer inspection, after bounding over to the display, was what Maybelline really meant by "Holographic", was "Duochrome". Maybe.


Often, Holos are blah indoors--so I still had hopes. I picked up the one that looked the least duo-chromey and after purchasing, held it up to the sky like a talisman. Total Holo dud.
Oh well, it's still pretty. This is Blue Blaze.


Maybelline describes this line on their website as 'color-morphing'. Blue Blaze appears to be a light denim blue in the bottle, but on the nail it leans towards a dusty purple.


I really didn't see too much shift, but you can tell in these photos is does appear to be a lighter shade in some lights, and can be a bit darker in others.


Shown here is 2 coats, base coat, but no top coat. Built up nicely in 2 coats, despite the first one being a little sheer.


Overall, this was not a holo, and I wouldn't exactly say it is a duo chrome either, but I do like the shade!

I am totally in to duochromes lately and I think Carpe Noctem Cosmetics spoiled us with some beautiful ones. See those HERE and HERE.
If you are on the lookout for some branded duochromes, Revlon has some pretty ones out in their Chameleon collection! 
Check out one of my swatches HERE.

Thanks for reading!

Saturday, July 13, 2013

Indie Review: Carpe Noctem Cosmetics South Haven Sunset

*Purchased by me
Cruelty Free

Remember Man in White by Carpe Noctem Cosmetics that I posted last week?
At the bottom of that post, I gave you a sneak peek at another one of Emily's duochromes, South Haven Sunset. 


South Haven Sunset is a shimmery denim blue with a golden shift.
Shown here is 2 coats over a SH Base coat and one coat of NYC top coat.


This photo was taken outside in direct sunlight to show the golden shift. All of Emily's polishes dry quickly, have awesome staying power and are 3 free! 
South Haven Sunset was inspired by the way the ocean/lake water looks when the sun is nearing the horizon...


Tell me that isn't EXACTLY what this close up looks like?!?!?!
I am totally a beach girl. There's something about the salty air, sandy feet and the sound of waves.
A couple of times each summer, I will make the trip down to the beach and spend the day. And there is NO better feeling that watching the sun set, the fishing boats come in, clam cakes and the drive home.
I love the happy, sleepy feeling that I have after a day at the beach. 
For me, the beach solves everything.


In the shade, SHS shows a lot of the golden shift and it quite stunning even when not in direct sunlight. You can see the blue shift in the bottle here too.


The blue was harder to catch at these angles, but you can see it in my index and pinky fingers.


I just really like this, and all of Emily's polishes actually...

Emily is working on new duochromes as we speak read, so head over to her Facebook page to see previews AND you can even help name them for a chance to win a free bottle!
You can also head over to her shop to check out some of her other fantastic polishes in 3 different sizes!

What do you think?! Remind you of sunsets and water?


Tuesday, July 9, 2013

Tips on Tuesday: PVA Glue

I have mentioned PVA glue a couple times on here and I know some of you readers are just itching to try it!
If you haven't heard of it before, PVA glue is simply Elmer's glue or any white craft glue. When painted on your nails it creates a peel off base coat that works perfectly with, you guessed it, GLITTER!
Now I think it is difficult to work with unless I use a brush to paint it on so this is what I did to get my PVA glue set up.


First you will need to gather your supplies: Acetone, a bottle of Elmer's Craft Glue and a bottle of clear polish. I used an almost empty bottle of clear that had pretty much died by this point.


I forgot to picture the cup above, but you will need something to empty the left over clear polish into for easy disposal, like a cup, a bag, maybe a garden...
 DO NOT pour any polish down your mother's sink. I don't want any phone calls!


Pour as much of the polish out of the bottle as you can.


Once your bottle is empty, fill it part way with Acetone. Do this outside in case you spill like I did. Acetone WILL eat things!


Once you have some Acetone in your bottle, gently roll the bottle around in your hands. You want the acetone to eat any left over polish in the bottle. I then poured out the acetone and rinsed the bottle out with water. If there is a white filmy residue left over: repeat this step again!


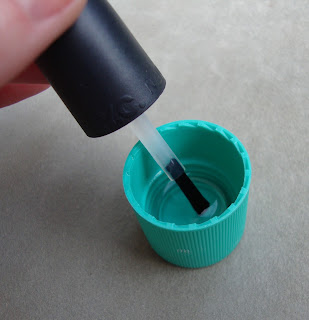
Pour a little acetone into the cap and make sure to rinse the polish brush so the bristles are soft (not crusty).


I dried the inside of the bottle with a Q-tip to soak up most of the water in there before adding the glue.


Squeeze the glue into the bottle and fill it up almost to the top!


Stick your brush in there!


You are now ready to paint your nails with the glue! Add a thin coat to all of your nails. Make sure you don't put it on too thick!


Wait for them to dry.


Keep waiting until they are completely clear! Now you are ready to paint!


Add 2 coats of your favorite glitter bomb! I picked my nails off at work so unfortunately, I don't have any photos of them, but once you start peeling, they will all come off usually in one sheet! Super easy glitter removal!

Weekend project?
Happy Tips on Tuesday!